[LINUX] - SECURING LINUX SYSTEMS
TOPIC A: IMPLEMENT CYBERSECURITY BEST PRACTICES
A chroot jail is a technique of controlling what a process a user can access on a file system by changing the root directory of that process's environment:
Encryption is a cryptographic technique that converts data from plaintext into coded, or ciphertext, form. Decryption is the companion technique that converts ciphertext back to plaintext:LUKS: Linux Unified Key Setup is a platform-independent FDE solution that is commonly that is commonly used to encrypt storage devices in a Linux environment.SSH Authentication Files in Linux
The following is a list of files that are used to configure SSH key-based authentication in Linux:
- ~/.ssh/ —A directory that contains files related to SSH keys.
- id_rsa —Contains the user's private key.
- id_rsa.pub —Contains the user's public key.
- authorized_keys —A file on the remote server that lists the public keys that the server accepts. In other words, the server uses this file to authenticate the client.
- known_hosts —A file on the client that lists the public keys that the client accepts. In other words, the client uses this file to authenticate servers.
- config —A file on the client that you can use to configure SSH connection settings, such as using an IdentityFile directive to associate multiple keys with specific servers.
 Note: The /etc/ssh/ssh_config file is similar to ~/.ssh/config except that it applies globally rather than to a specific user.
THE sshd_config FILE
The /etc/ssh/sshd_config file is used to configure an SSH server. Some of the settings you can configure include the following.
Setting | Used To |
PasswordAuthentication | Enable or disable password-based authentication. |
PubkeyAuthentication | Enable or disable public key-based authentication. |
HostKey | Reference the locations of the server's private keys. |
UsePAM | Enable or disable support for Pluggable Authentication Modules (PAM). |
Port | Change the port number to bind the SSH service to. |
ListenAddress | Change the IP address the SSH service should listen on. |
SyslogFacility | Change the logging level of SSH events. |
ChrootDirectory | Reference a chroot jail path for a user. |
AllowUsers, AllowGroups | Enable user-specific access by allowing the specified users or groups access over SSH. |
DenyUsers, DenyGroups | Restrict the specified users or groups from accessing the server over SSH. |
PermitRootLogin | Enable or disable the ability for the root user to log in over SSH. |
 Note: The sshd_config file is not be confused with the ssh_config file mentioned earlier.
TCP WRAPPERS
While you can deny access to specific users and groups, you can also deny connections to SSH that come from specific hosts. This is done by wrapping the SSH service in a TCP wrapper, which checks what hosts are explicitly allowed and denied before permitting the host to connect with the SSH service. You can specify hosts to allow in /etc/hosts.allow and hosts to deny in /etc/hosts.deny. The former has precedence over the latter, and is applied first. In these files you can specify hosts by their hostnames, IP addresses, network segments, etc.
For example, to deny all hosts, add the following line to /etc/hosts.deny:
sshd : ALL
Then, to whitelist your desired hosts, add them to /etc/hosts.allow:
sshd : 192.168.1.0/24
sshd : server01@domain.tld
PKI Components
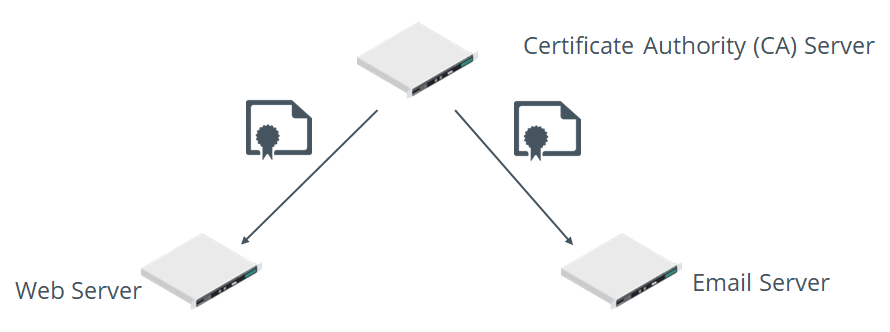
Figure: A PKI hierarchy in which a CA issues certificates to servers.
OpenSSL
OpenSSL is an open source implementation of the SSL/TLS protocol for securing data in transit using cryptography.
SYNTAX
The syntax of the openssl command is openssl [subcommand] [options]
TOPIC C: Configure SELinux or AppArmor
SELinux Context
User:
- unconfined_u: All users
- user_u: Unprivileged users
- sysadm_u: System administrators
- root: The root user
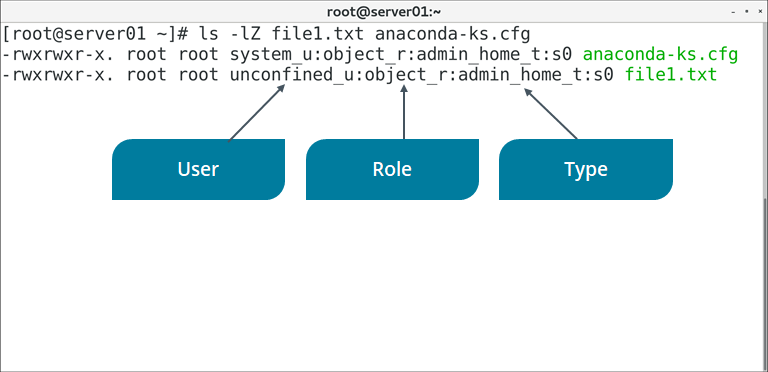
Figure: An example of a file's SELinux contexts.
SELinux Modes
SELinux has three different modes. Each mode configures the overall implementation of SELinux on the system.
Mode | Description |
Disabled | In this mode, SELinux is turned off. So, MAC will not be implemented and the default DAC method will be prevalent. |
Enforcing | In this mode, all the SELinux security policies are enforced. Therefore, processes cannot violate the security policies. |
Permissive | In this mode, SELinux is enabled, but the security policies are not enforced. So, processes can bypass the security policies. However, when a security violation occurs, it is logged and a warning message is sent to the user. |
SELinux Commands
The following table describes some of the major commands that you can use to configure an SELinux environment.
Command | Used To |
semanage | Configure SELinux policies. |
sestatus | Get the status of SELinux, including its current mode, policy type, and mount point. |
getenforce | Display which mode SELinux is running in. |
setenforce | Change which mode SELinux runs in. You can issue setenforce 1 to enable enforcing mode and setenforce 0 to enable permissive mode. |
getsebool | Display the on/off status of SELinux boolean values. Boolean values enable you to change policy configurations at runtime without actually writing the policy directly. |
setsebool | Change the on/off status of an SELinux boolean value. |
ls -Z | List directory contents along with each object's security context. You can check the context of specific objects by issuing ls -Z {file or directory name} |
ps -Z | List running processes along with each process's security context. You can check the context of specific processes by issuing ps -Z {PID} |
chcon | Change the security context of a file. The basic syntax is chcon {-u|-r|-t} {context value} {file or directory name} where {-u|-r|-t} refers to user, role, or type, respectively. |
restorecon | Restore the default security context of one or more files. You restore objects by issuing restorecon {file or directory name} |

Figure: Checking the status of SELinux.
AppArmor
AppArmor Commands
The following table describes some of the major commands that you can use to configure an AppArmor environment.
Command | Used To |
apparmor_status | Display the current status of AppArmor profiles. |
aa-complain | Place a profile in complain mode. The basic syntax is aa-complain {path to profile} |
aa-enforce | Place a profile in enforce mode. The basic syntax is aa-enforce {path to profile} |
aa-disable | Disable a profile, unloading it from the kernel. The basic syntax is aa-disable {path to profile} |
aa-unconfined | List processes with open network sockets that don't have an AppArmor profile loaded. |
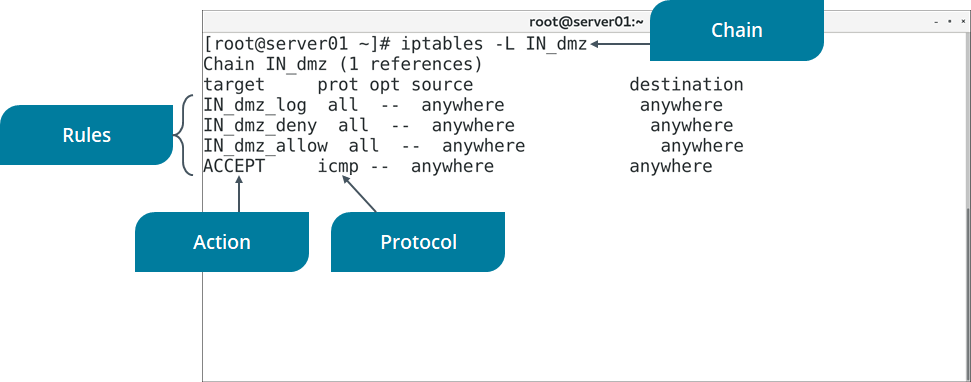
Figure: Listing the rules in a firewall chain.
SYNTAX
The syntax of the iptables command is iptables [options] [-t table] [commands] {chain/rule specification}
DEFAULT TABLES
There are five default tables that may be active depending on how the kernel is configured:
- filter —The default table used for typical packet filtering functionality.
- nat —Used to implement Network Address Translation (NAT) rules.
- mangle —Used to alter packets' TCP/IP headers.
- raw —Used to configure exceptions for packets involved in connection tracking.
- security —Used to mark packets with SELinux security contexts.
LOGGING
You can enable logging for iptables rules by including the LOG action. In the following example, all dropped packets are being logged:
iptables -N LOGCHN
iptables -I INPUT -j LOGCHN
iptables -I LOGCHN -j LOG
iptables -I LOGCHN -j DROP
The first line creates a new chain called LOGCHN. The second line ensures all incoming packets not already processed by any prior rules will "jump" to the LOGCHN chain. The third line logs all packets that reach this chain, and the fourth line performs the actual dropping of packets. You can also substitute ACCEPT for DROP if you only want to log accepted packets.
Events for iptables are typically written to the /var/log/messages or /var/log/kern.log files.
UFW
The Uncomplicated Firewall (UFW) is a firewall management tool that makes it easier to configure the iptables service.
For example, the following commands set up an allow rule for HTTP, turn on logging, and enable the firewall. This automatically creates a default deny configuration for incoming traffic—in other words, everything without an explicit allow rule is dropped:
ufw allow http/tcp
ufw logging on
ufw enable
SYNTAX
The syntax of the ufw command is ufw [options] {action}
THE firewalld SERVICE
The firewall daemon (firewalld) is used to dynamically manage a firewall without requiring the firewall to restart upon modification. It is an alternative to iptables and uses zones and services rather than chains and rules.
THE firewall-cmd COMMAND
The firewall-cmd command enables you to configure firewalld by querying, adding, modifying, and deleting zones and services as desired

Figure: Listing the configurations for a specific firewalld zone.
SYNTAX
The syntax of the firewall-cmd command is firewall-cmd [options]
firewall-cmd COMMAND EXAMPLES
The following are some common examples of using the firewall-cmd command:
- firewall-cmd --get-zones —list all available firewalld zones.
- firewall-cmd --zone=dmz --list-all —list all details of the dmz zone, including the interfaces, ports, services, protocols, and more that the zone applies to.
- firewall-cmd --zone=dmz --change-interface=<device ID> —add the specified interface to the dmz zone.
- firewall-cmd --zone=dmz --add-service=http —add the HTTP service to the dmz zone.
- firewall-cmd --zone=dmz --add-port=21/tcp —add TCP port 21 (FTP) to the dmz zone.
- firewall-cmd --zone=dmz --remove-service=http —remove the HTTP service from the dmz zone.
- firewall-cmd --zone=dmz --remove-port=21/tcp —remove TCP port 21 (FTP) from the dmz zone.
- firewall-cmd --reload —reload the zone's configuration.
Netfilter
Netfilter is a Linux kernel framework that handles packets that traverse a network interface. Some of the major services it provides are packet filtering, NAT, and connection tracking. The iptables tool is closely integrated with Netfilter. It is able to allow, drop, and perform other firewall actions because it can interact with packets that are on Netfilter hooks. Both UFW and firewalld call iptables in some capacity, so they likewise rely on Netfilter.
P Sets
The ipset command enables you to create and modify IP sets. First you need to set a name, storage method, and data type for your set, such as:
ipset create range_set hash:net
In this case, range_set is the name, hash is the storage method, and net is the data type. Then, you can add the ranges to the set:
ipset add range_set 178.137.87.0/24
ipset add range_set 46.148.22.0/24
Then, you use iptables to configure a rule to drop traffic whose source matches the ranges in this set:
iptables -I INPUT -m set --match-set range_set src -j DROP
Alternatively, to drop traffic whose destination matches the set:
iptables -I OUTPUT -m set --match-set range_set dst -j DROP
SYNTAX
The syntax of the ipset command is ipset [options] {command}
TROUBLESHOOTING
The ipset tool can also be used when troubleshooting the iptables firewall. For example, you can use the test subcommand to test whether or not an entry exists:
ipset test range_set 178.137.87.5
If the firewall still isn't handling the IP address ranges as expected, you can list the rules that are using the relevant set:
iptables -L | grep range_set
Even if the rules are using your set, keep in mind that the rules are processed in order; the unexpected behavior may be due to how these rules flow in the table.
DenyHosts and Fail2ban
There are many IPS solutions available. Two common third-party solutions are DenyHosts and Fail2ban, both of which examine log files for anomalies.
DenyHosts primarily protects SSH servers from brute force password cracking attacks. It will take the source IP address and number of failed attempts into consideration. If enough failed attempts from the same source meet the threshold you've configured (or the default), DenyHosts will block that source.
Fail2ban also prevents brute force attacks, but unlike DenyHosts, it does not focus on any one service. Instead, it can monitor log files that pertain to any system service with an authentication component. Fail2ban leverages Netfilter and iptables to actually perform blocking actions, and can even be used to update your firewall rules. Fail2ban supports both IPv4 and IPv6.
CONFIGURATION
The primary configuration file for DenyHosts is the /etc/denyhosts.conf file. There are various settings you can adjust in this file. Some examples include:
- ADMIN_EMAIL —Define what email address to send alerts to.
- BLOCK_SERVICE —Define what services will be blocked from access by unauthorized users.
- DENY_THRESHOLD_VALID —Defines how many times a user can attempt to log in to an existing account before being blocked.
The primary configuration file for Fail2ban is the /etc/fail2ban/jail.conf file. However, if you plan on configuring Fail2ban, it is best to copy this file to /etc/fail2ban/jail.local or make a custom .conf file within the /etc/fail2ban/jail.d/ directory. The following are some example settings:
- bantime —Defines how long a host is blocked from accessing a resource.
- maxretry —Defines the number of times a host can fail to authenticate before being blocked.
- ignoreip —Defines a whitelist of accepted hosts.
Log File | Contains |
/var/log/syslog | All types of system events except for authentication messages. Primarily used by Debian-based distros. |
/var/log/messages | General non-critical system events. Primarily used by RHEL and CentOS. |
/var/log/auth.log | Authentication messages (e.g., login successes and failures). Primarily used by Debian-based distros. |
/var/log/secure | Authentication messages. Primarily used by RHEL and CentOS. |
/var/log/kern.log | Kernel messages (e.g., dmesg output). |
/var/log/[application] | Messages from miscellaneous applications (e.g., cron, firewalld, maillog, etc.). |
Log Rotation
CONFIGURATION
Log rotation behavior can be configured in the /etc/logrotate.d/ directory, where each relevant service has its own configuration file. The following is an example configuration file for a service called myservice:
/var/log/myservice.log {
size 1k
create 700 user group
dateext
rotate 10
}
The first line defines where the log should be output. The size directive indicates that the log should rotate when it reaches 1,000 bytes in size. The create directive rotates the log file by creating a new one with the specified permissions, user, and group. The dateext directive appends the date to the rotated log. Finally, rotate specifies that only the 10 most recent log files should be kept.
THE journalctl COMMAND
The journalctl command enables you to view and query log files created by the journal component of the systemd suite. Log information is collected and stored via the systemd journald service.
The journald service is often used in conjunction with a traditional syslog daemon such as syslogd or rsyslogd. The settings for journald are configured in the /etc/systemd/journald.conf file.
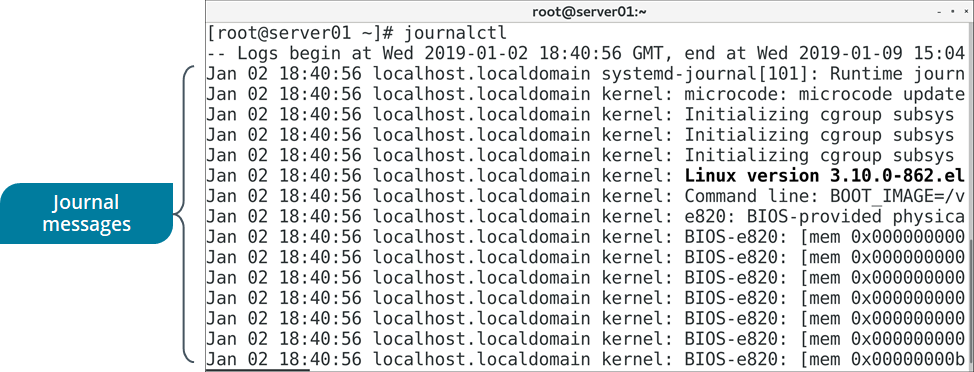
Figure: Viewing the systemd journal.
SYNTAX
The syntax of the journalctl command is journalctl [options] [matches]
journalctl COMMAND OPTIONS
The journalctl utility provides a number of options for querying journald log data. Some of the frequently used options are listed in the following table.
Option | Used To |
-n {number of lines} | Specify the number of lines of journal logs to display. |
-o {output format} | Specify the format of the output. For example: short, verbose, or export. |
-f | Display the most recent journal entries, and continuously update the display with new entries as they are added to the journal. |
-p | Filter journal log output by severity (alert, err, warning, notice, info, etc.). |
-u | Filter journal log output by the specified unit, such as the name of a service. |
-b [boot ID] | Show log message from the current boot only, or the boot ID specified. |
THE /var/log/journal/ DIRECTORY
In its default configuration, the systemd journal only stores logs in memory, and logs are cleared on each system reboot. You can have the journald logs persist after a reboot by creating the /var/log/journal/ directory. The systemd service is configured to automatically maintain logs in this directory if it exists.
THE last COMMAND
The last command displays the running history of user login and logout actions, along with the actual time and date. It also has options that enable you to filter users who have logged in through a specific terminal. For example, last 1 will display the details of users who logged in using the first terminal. The last command retrieves information from the /var/log/wtmp file.
To pull this same information for only failed login events, you can use the lastb command. This command retrieves information from the /var/log/btmp file.
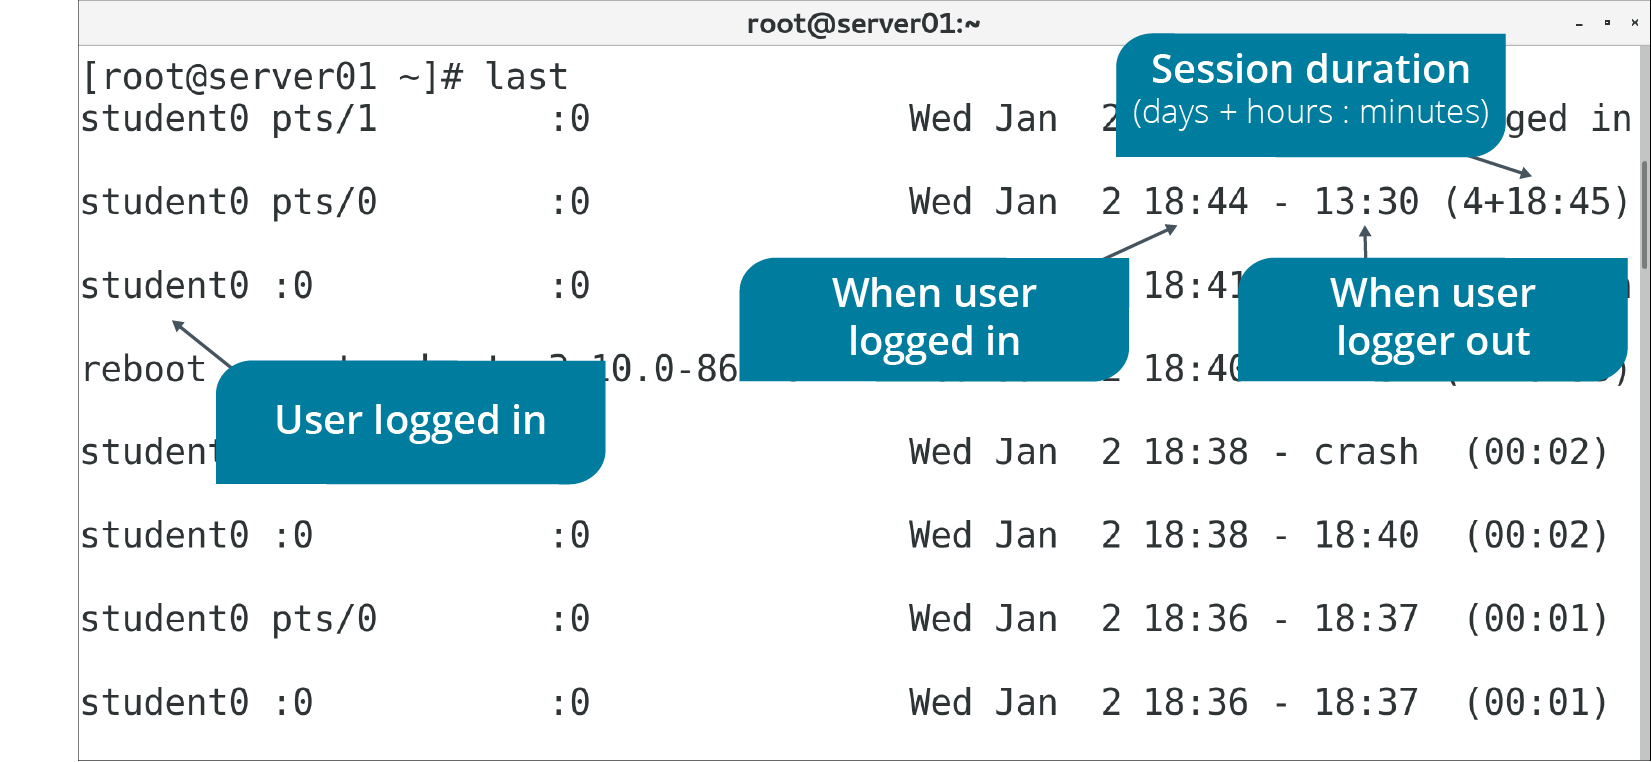
Figure: Displaying user login/logout history.
SYNTAX
The syntax of the last command is last [options]
THE lastlog COMMAND
The lastlog command is similar to the last command, but instead of listing the most recent login events, it lists all users and the last time they logged in. This command retrieves information from the /var/log/lastlog file.
TOPIC F: Backup, Restore, and Verify Data
Backup Types

Figure: A full backup.

THE tar COMMAND
The tar command enables you to create archives of data. It's commonly used to create an archive file from a directory that contains the data you want to back up. You can also use the command on previously created archives to extract files, store additional files, update files, and list files that were already stored.

Figure: Creating an archive from multiple files.
SYNTAX
The syntax of the tar command is tar [options] {file names}
RESTORING FILES WITH THE tar COMMAND
The command tar -xvf will restore the entire contents of the source file or directory structure. To restore a portion of a tar file, use the path and name of the file you wish to extract. You must use the exact path and name that was used when you created the tar file. You can also make restores interactive by using the command tar -wxvf [destination] [source]
THE dar COMMAND
The dar ("disk archiver") command is intended to replace tar by offering more backup and archiving functionality. It is especially useful at creating full, differential, and incremental backups. The following command creates a full backup of the mydata directory and outputs a backup file named full.bak:
dar -R mydata -c full.bak
To create a differential backup (diff1.bak), you can reference the full backup using the -A option:
dar -R mydata -c diff1.bak -A full.bak
You can then create more differential backups as needed by referencing the full backup with the -A option. However, to perform incremental backups instead, you need to reference the previous incremental backup, like so:
dar -R mydata -c incr1.bak -A full.bak
dar -R mydata -c incr2.bak -A incr1.bak
The -x (extract) option is used to recover a backup. If you performed differential backups, you need to first extract the full backup, then the latest differential backup:
dar -x full.bak
dar -x diff1.bak -w
The -w option automatically overwrites changes to files; otherwise, you will be prompted to confirm.
To recover an incremental backup, you need to first extract the full backup, then each incremental backup, in order:
dar -x full.bak
dar -x incr1.bak -w
dar -x incr2.bak -w
THE dd COMMAND
The dd command copies and converts files to enable them to be transferred from one type of media to another. The dd command has various operands, or actions, to perform.
Operand | Used To |
if={file name} | Specify the file from which data will be read. |
of={file name} | Specify the file to which data will be written. |
bs={bytes} | Specify the total block size to read and write, in bytes. Bytes can also be formatted in a more human-friendly way, such as 50M to specify 50 megabytes and 10G to specify 10 gigabytes. |
count={count} | Specify the number of blocks to be written to the output file from the input file. |
status={level} | Specify the level of information to print to standard error:
|
 Note: A selected input file is copied to a selected output file. If no files are selected, the standard input and the standard output are used.
SYNTAX
The syntax of the dd command is dd [options] [operands]
USING dd FOR BACKUPS
You can use dd to perform a full backup of a storage partition. The following example copies data from /dev/sda1 to /dev/sdb2:
dd if=/dev/sda of=/dev/sdb
Using dd, you can also create an image of a drive and then clone a second drive with it:
dd if=/dev/sda of=drive_image.iso
dd if=drive_image.iso of=/dev/sdb
THE mirrorvg COMMAND
The mirrorvg command creates copies, or mirrors, of all logical volumes in a specified logical volume group.
SYNTAX
The syntax of the mirrorvg command is mirrorvg [options] {volume group}
OTHER WAYS TO MIRROR LOGICAL VOLUMES
Other than using mirrorvg to mirror all volumes in a group, you can also use the mklvcopy command to mirror individual logical volumes in a volume group. You can also use the -m# option with lvcreate to create one or more mirrors of a logical volume. For example, the following command creates one 10 GB mirror called mirrorlv that copies from the volgr volume group:
lvcreate -L 10G -m1 -n mirrorlv volgr
Data Transfer Tools
The following data transfer tools are useful in facilitating the off-site backup process.
Data Transfer Tool | Description |
scp | This tool is used to copy data to or from a remote host over SSH. Because it uses SSH, data you send to an off-site backup will be encrypted in transit, protecting its confidentiality. Like SSH, scp uses TCP port 22 by default. The following is an example of copying a file to a remote host: scp file.txt user@host:/home/dir |
sftp | This command is the implementation of the Secure File Transport Protocol (SFTP). SFTP uses SSH tunnel as a transportation mechanism to encrypt data. Whereas scp is used purely for transferring files, sftp can transfer files and manage files and directories. So, you can list, create, and remove directories on the remote system. The sftp command also supports resuming file transfers, whereas scp does not. Just like with the standard ftp command, you can use sftp interactively or non-interactively. For example, to retrieve a file non-interactively: sftp user@host:file.txt |
rsync | This tool is used to copy files locally and to remote systems. Its real power lies in its efficient use of network bandwidth; instead of copying all files, it only copies differences between files. So, if you use rsync on all files in a directory, it will check the destination directory to see if those exact files already exist. Only files that aren't already in the destination will be copied. The rsync command can copy files over SSH, or it can use the rsyncd daemon if you set it up on the remote system. The following is an example of synchronizing the files in a local directory to a remote directory over SSH: rsync -a /home/mydir/ user@host:/home/mydir/ |
gzip COMMAND
GNU zip (gzip) is a compression utility that reduces the size of selected files. Files compressed with gzip frequently have the .gz file extension. The gzip command has several options. These command options are described in the following table.
Option | Used To |
-d | Reverse file compression (decompression). |
-f | Force compression or decompression of a file even if it has multiple links or if the file exists. |
-n | Omit saving the original file name and timestamp. |
-N | Save the original file name and timestamp. |
-q | Suppress all warnings. |
-r | Enable directory recursion during compression or decompression. |
-v | Display the name and percentage reduction of the compressed or decompressed file. |
-t | Perform an integrity check on the compressed file. |
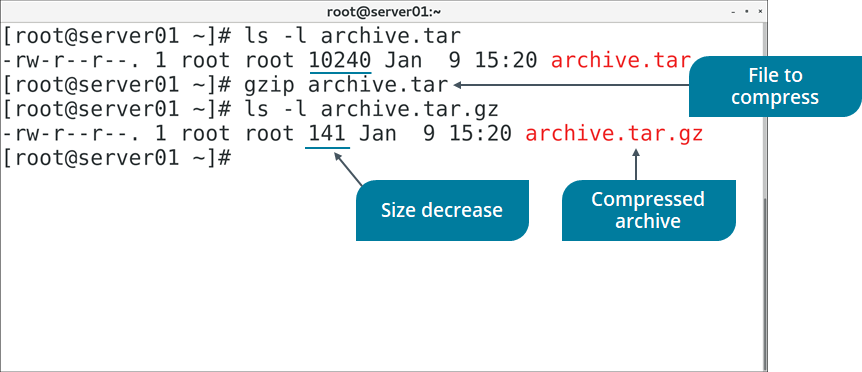
Figure: Compressing an archive file with gzip.
SYNTAX
The syntax of the gzip command is gzip [options] [file names]
THE gunzip COMMAND
The gunzip command is equivalent to issuing gzip -d at the command-line.
THE xz COMMAND
The xz command is a data compression utility, similar to gzip, that reduces the size of selected files and manages files in the .xz file format. The xz command has several options.
Option | Used To |
-d | Decompress a file. |
-f | Force compression or decompression of a file even if it has multiple links or if the file exists. |
-q | Suppress all warnings. |
-v | Display the name and percentage reduction of the compressed or decompressed file. |
-t | Perform an integrity check on the compressed file. |
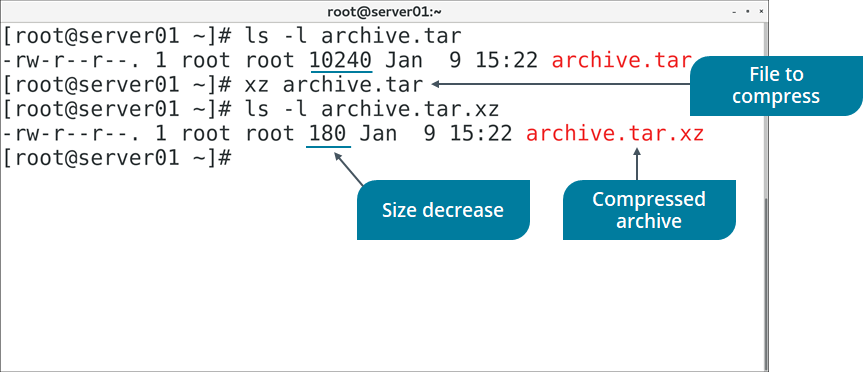
Figure: Compressing an archive file with xz.
SYNTAX
The syntax of the xz command is xz [options] [file names]
THE bzip2 SUITE
The bzip2 command and its related commands manage file compression. Files compressed with bzip2 frequently have the .bz2 file extension. The bzip2-related commands are described in the following table.
Command | Used To |
bzip2 | Compress a file. |
bunzip2 | Decompress a file. |
bzcat | Decompress a file to standard output. |
bzdiff | Run the diff command on compressed files. |
bzip2recover | Recover data from damaged .bz2 files. |
bzless | Run the less command on compressed files. |
bzmore | Run the more command on compressed files. |
 Note: Archives made with tar are frequently compressed with gzip (resulting in the file extension .tar.gz) or bzip2 (resulting in the file extension .tar.bz2).
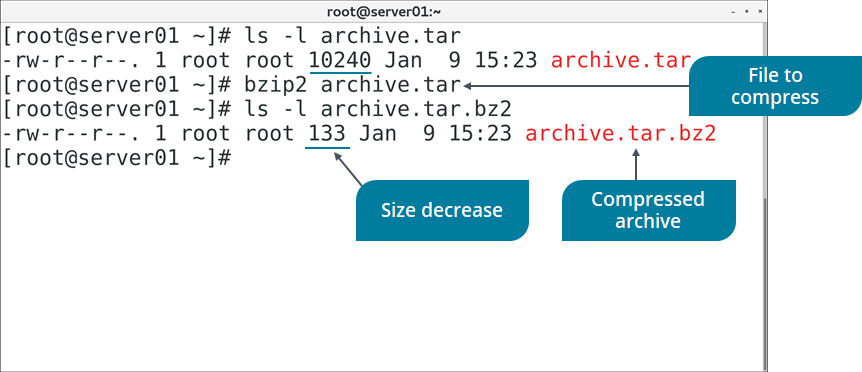
Figure: Compressing an archive file with bzip2.
SYNTAX
The syntax of the bzip2 command is bzip2 [options] {file names}
For example, to compress files file1 and file2:
bzip2 file1 file2
THE zip COMMAND
The zip command is another compression utility, but unlike gzip, xz, and bzip2, it also features file archiving functionality. In fact, zip is a combination of an older compression utility called compress and the tar archive command. Files compressed with zip frequently have the .zip file extension. The zip command has several options.
Option | Used To |
-d | Delete entries in a .zip archive. |
-e | Encrypt the contents of an archive. |
-F | Fix a corrupted .zip archive. |
-r | Enable recursion. |
-T | Perform an integrity check on the archive file. |
SYNTAX
The syntax of the zip command is zip [options] [file names]
Which Compression Method Should You Choose?
Ultimately, consider using:
- gzip if you just care about compressing and decompressing files as fast as possible and are less concerned with storage space.
- xz if storage space is at a premium, and time is not as much of a factor.
- bzip2 to strike a balance, and for data that rarely needs to be decompressed.
Hash Functions
A hash function is an algorithm that performs a hashing operation. The two most common hash functions for checking data integrity on Linux systems are MD5 and SHA.
The Message Digest 5 (MD5) algorithm produces a 128-bit message digest. It is still used in integrity checking.
The Secure Hash Algorithm (SHA) algorithm is modeled after MD5 and is considered the stronger of the two. Common versions of SHA include SHA-1, which produces a 160-bit hash value, while SHA-256, SHA-384, and SHA-512 produce 256-bit, 384-bit, and 512-bit digests, respectively.
THE md5sum COMMAND
The md5sum command is used to calculate the hash value of a file or standard input using the MD5 hash function. MD5 hashes are 128-bits in length. Like many other hash values, they are typically represented in hexadecimal format (32 characters for MD5). The following is the hash value of the string "Linux":
edc9f0a5a5d57797bf68e37364743831
SYNTAX
The syntax of the md5sum command is md5sum [options] [file name]
SHA Commands
There are several different commands that you can use to calculate SHA hash values. These commands are functionally identical to md5sum, but use the SHA function with the applicable bit size:
- sha1sum
- sha256sum
- sha384sum
- sha512sum

Figure: Calculating the hash value of a file.
SYNTAX
The syntax of the sha#sum commands is sha#sum [options] [file name]
LAB
Encrypting a Volume
Scenario
The data you'll be backing up to your various logical volumes is sensitive in nature and should not be readable if it were to fall into the wrong hands. To protect the confidentiality of your backed up data, you'll encrypt the volumes that hold this data. You'll start with the databk volume. Without the correct key (e.g., a passphrase), a user will only see the scrambled ciphertext of this volume, and will be unable to read the plaintext data of individual files.
Objectives
Completing this activity will help you to use content examples from the following syllabus objectives:
- 3.3 Summarize security best practices in a Linux environment
Prepare the data backup volume for encryption
Log in as student01 with Pa22w0rd as the password.
In a terminal window, enter sudo umount /backup/data
Enter sudo shred -v --iterations=1 /dev/backup/databk
This will overwrite the contents of the volume to securely wipe any existing data. This is a good practice to ensure that no sensitive data remains before you prepare the encrypted volume.
Verify that the shred command finishes successfully.
Encrypt the data backup volume with a passphrase
Enter sudo cryptsetup -v --verify-passphrase luksFormat /dev/backup/databk
Enter YES when prompted to confirm.
When prompted for a passphrase, enter linuxplus
Verify the passphrase.
Verify that the command was successful.
Open the encrypted volume and verify that it is listed
Enter sudo cryptsetup luksOpen /dev/backup/databk databk
Enter linuxplus as the passphrase.
Verify that you are returned to a prompt without errors.
Enter ls -l /dev/mapper | grep databk
Verify that the encrypted volume is listed
Add the encrypted volume to the /etc/crypttab and /etc/fstab files
Enter sudo bash -c "echo databk /dev/backup/databk none >> /etc/crypttab"
Enter sudo cat /etc/crypttab and confirm that the line was added.

This file is similar to /etc/fstab and initializes encrypted storage devices at boot.
Using sudo, open the /etc/fstab file in your text editor of choice.
Edit the line that mounts the /dev/backup/databk volume to say the following:
/dev/mapper/databk /backup/data ext4 nofail 0 0
This will mount the encrypted volume after it has been unlocked. The nofail option indicates that the system should not report any errors if the volume is not detected.
Save and close the file.
Reboot the machine and unlock the encrypted volume
Enter systemctl reboot -i
Verify that, rather than the normal sign in screen, you are prompted to unlock the encrypted volume with your passphrase.
Enter linuxplus
Sign in as your student account.
Using your preferred method, open the /backup/data/encrypt.txt file and verify you can read its plaintext contents.
Enter sudo bash -c "echo > /etc/crypttab"
You're clearing this file so you won't be prompted to unlock the volume every time you reboot. You can still unlock the volume manually after you've booted into the OS.
Encrypting a volume in this way requires physical access to the computer in order to unlock it and complete the boot process. You won't be able to SSH into the system to unlock it.
onfiguring SSH Authentication Using a Key Pair
Scenario
You want to enable your fellow administrators to remotely access servers that are physically located elsewhere. By default, the servers are already set up to accept encrypted SSH connections. Recently, however, Develetech has been the victim of several brute force password cracking attempts. Attackers have tried to gain remote access by running through various combinations of passwords. To minimize the risk of these attacks, you decide to change the authentication method that administrators will use to connect remotely. You'll have them each generate a cryptographic key pair that they'll use to prove their identities. Anyone without the key will be denied access. You'll also disable password authentication on the servers to mitigate brute force attacks.
Objectives
Completing this activity will help you to use content examples from the following syllabus objectives:
2.5 Summarize and explain server roles
3.2 Given a scenario, configure and implement appropriate access and authentication methods
3.3 Summarize security best practices in a Linux environment
Generate a public and private key pair to use with SSH authentication
Enter ssh-keygen to generate a key pair.
Press Enter to accept the default path in which to save the key.
Enter linuxplus as the passphrase.
You don't need to protect a private key with a passphrase, but doing so adds a second factor to the authentication process, and is recommended. The passphrase will decrypt the private key before it is used to solve the server's encrypted challenge.
Enter the passphrase again.
Verify that the keys were generated and saved to the home directory
Enter cat .ssh/id_rsa and examine the (encrypted) private key.
This is the key you'll use to validate the SSH server's encrypted challenge.
Enter cat .ssh/id_rsa.pub and examine the public key.
The server needs to install this public key once. The server will use this public key to verify the authenticity of the private key.
Copy your public key to your second server
Enter ssh-copy-id student02@server02 to copy your public key to server02.
Enter yes to accept the authenticity of your second server.
When prompted for a password, enter Pa22w0rd
Verify that your public key was added to your second server
Select CentOS 7 (2nd) and log in as student02.
Enter cat .ssh/authorized_keys and verify that your key was added.
Any public keys added to this file are considered authorized and will be used in SSH authentication. If you wanted to authenticate other users, you could have them generate a unique key pair and then add their public key to this file as well.
Authenticate with your second server's SSH server using your private key
Select CentOS 7 to return to server01.
Enter ssh student02@server02
When prompted, type (but don't press Enter) linuxplus as the passphrase to unlock your private key.
Check the Automatically unlock this key whenever I'm logged in check box.
Select Unlock.
Verify that you are signed in to server02 as the student02 account.
If you get an "Authentication failed" message, enter the ssh command again.
You've successfully authenticated to the second SSH server.
For added security, disable password authentication
Enter exit to close your SSH session and return to your local login on server01.
Switch back to the CentOS 7 (2nd) virtual machine.
Using sudo, open the /etc/ssh/sshd_config file in your desired text editor.
Scroll down until you get to the PasswordAuthentication yes line.
Change yes to no and then save and quit the file.
Enter sudo systemctl restart sshd
Switch back to CentOS 7
Enter ssh ariley@server02
You have no private key for this account, and the server isn't accepting passwords.


Comments
Post a Comment