[LINUX] - MANAGING STORAGE

 [LINUX] - MANAGING STORAGE

Topic A: Create Partitions

Types of File Systems


# ext3: recovery speed and data integrity
# ext4: Default file system on Ubuntu, volume size, journaling
# XFS: Default file system on CentOS/RHEL 7, high-performance journaling, fast recovery 

Network file systems: SMB, CIFS, NFS
Inodes (index nodes): Objects that store metadata about files and directories on a file system


Virtual File System (VFS): proc, devtmpfs, debugfs

Real File Systems: xfs, ext4

Fdisk

Create, modify, create partitions on a storage device
# fdisk /dev/sda
# fdisk -l: list partition tables for devices


GNU Parted: also used to manage partitions: create, destroy, and resize partitions


fdisk vs parted: the former for a disk smaller 2TB, the second command for disk bigger than 2TB

partprobe: update the kernel with changes in partition table

mkfs command

Build a Linux file system on a device, which is usually a drive partition.

Syntax: mkfs [options] {device name}


fstab file: /etc/fstab: configuration file storing info about storage devices and partitions and where and how the partitions should be mounted


Storage Device Setup Process:

  • Partition the storage device using fdisk or parted
  • Format the partition with a file system using mkfs tool
  • Add the formatted partition to fstab file so that it is configured by the system on boot

Lab

Create two new partitions:

  • 1st new partition: hold system data in an XFS file system
  • 2nd new partition: hold critical business file and other user data in an ext4 file system 

Creating Partition

Create the first new logical partition

# sudo fdisk /dev/sda
# m (for help)
# p (to print)
# n (to begin creating a new partition)
# Press Enter to accept the default partition number
# Press Enter to accept the default first sector
# +4096M: to create a partition 4GB in size
# p: to print
# w: to write your changes to the partition table and exit


#sudo partprobe: to update the kernel with the partition table changes 


Create an XFS file system on the new partition

# sudo mkfs.xfs /dev/sda4

Create a second new partition with an ext4 file system

# parted /dev/sda
# print
# mkpart
# ext4 
# 121GV
# 129GB
# print


Create an ext4 file system on the new partition 

# sudo mkfs.ext4 /dev/sda5


Apply new labels to the new partitions

# sudo xfs_admin -l /dev/sda4
# sudo xfs_admin -L SysBackup /dev/sda4
# sudo e2label /dev/sda5
# sudo e2label /dev/sda5 DataBackup 


Managing Logical Volumes

Identify the current logical volumes on the system

# ls /dev/mapper


Scan the system for pv, vg, and lv

# sudo pvscan


# sudo pvdisplay


# sudo vgscan


# sudo vgdisplay centos


# sudo lvscan


# sudo lvdisplay /dev/centos/home


Create physical volumes from backup partitions you created previously

# sudo pvcreate /dev/sda4 /dev/sda5
# y
# sudo pvdisplay


Create a volume group from these new physical volumes

# vgcreate backup /dev/sda4 /dev/sda5
# vgdisplay backup


Create three logical volumes in the new volume group

# lvcreate --name sysbk --size 1GB backup


# lvcreate --name databk --size 2GB backup


# lvcreate --name logbk --size 3GB backup


# lvdisplay backup


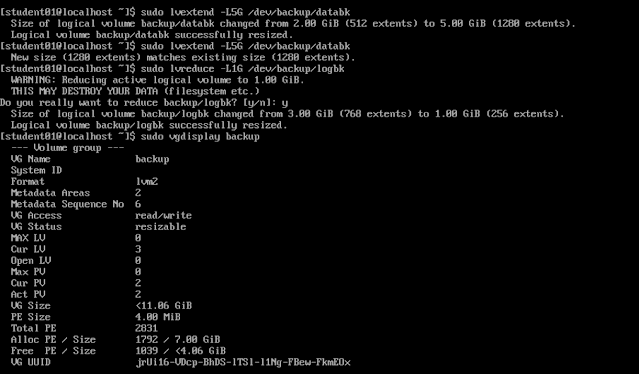
Extend the data backup volume and reduce the log volume

# sudo lvextend -L5G /dev/backup/databk
# sudo lvreduce -L1G /dev/backup/logbk
# sudo vgdisplay backup


Create file systems on the logical volumes

# sudo mkfs.xfs /dev/backup/sysbk


# sudo mkfs.ext4 /dev/backup/databk


# sudo mkfs.ext4 /dev/backup/logbk


Mounting File System
Create mount points for the logical volumes

Create three directories 
# mkdir -p /backup/sys /backup/data /backup/log
# ls /backup
# sudo mount /dev/backup/sysbk /backup/sys
# sudo mount /dev/backup/databk /backup/data
# sudo mount /dev/backup/logbk /backup/log
# mount

Unmount a volume

# sudo umount /backup/log
# mount

Ensure the logical volumes are mounted on boot

# sudo vim /etc/fstab
# Press i to enter insert mode

Enter the last three following lines:
# /dev/backup/sysbk /backup/sys xfs defaults 0 0
# /dev/backup/databk /backup/data ext4 defaults 0 0
# /dev/backup/logbk /backup/log ext4 defaults 0 0


# Press Esc and :wq to save the file and quit
# sudo mount -a

Managing File System

Query the system for information about block storage devices

# lsblk -f


Scan logical volumes for errors

sudo umount /dev/backup/databk
# sudo fsck /dev/backup/databk
# sudo fsck -r

# sudo umount /dev/backup/sysbk
# sudo xfs_repair /dev/backup/sysbk

Increase the size of an ext4 file system on a volume

# sudo e2fsck -f /dev/backup/databk


# sudo lvextend -L6G /dev/backup/databk


# sudo 2efsck -f /dev/backup/databk
# sudo resize2fs /dev/backup/databk
# sudo mount /dev/backup/databk /backup/data


Increase the size of an XFS file system on a volume

# sudo lvextend -L2G /dev/backup/sysbk
# sudo mount /dev/backup/sysbk /backup/sys
# sudo xfs_growfs /dev/backup/sysbk

TOPIC E: NAVIGATE THE LINUX DIRECTORY STRUCTURE

Standard Directories

/bin: Essential command-line utilities/binaries
/boot: Files necessary to boot Linux
/dev: Hardware and software device drivers
/etc: Basic configuration files
/home: Users' home directories
/lib: Shared program libraries
/media: Mount points for removable media
/mnt: Mount point for temporarily mounting file systems
/opt: optional files of large software packages
/proc: virtual file system that continually updated kernel information 
/root: home directory of root
/sbin: stores binaries used for booting process and the ones used by the root user (/sbin/ifconfig)
/sys: another VFS, primarily stores information about devices (/sys/block)
/tmp: temporary files lost on system shutdown
/usr: read-only directory storing small programs and files accessible to all users
/var: variable files, or files expected to change as the system runs (log files, printer spools, networking services' configuration file)

/usr SUBDIRECTORIES

/usr/bin: includes executable programs that can be executed by all users
/usr/local: custom build applications stored here by default
/usr/lib: object libraries and internal libraries needed by executable programs
/usr/lib64
/usr/share: read-only architecture independent files

 Tracking Space Storage Usage

# df -h


# df -h /backup/data

# iostat -d /dev/backup/databk


Configuring Storage Data

Enable quota for the data backup volume
# sudo vim /etc/fstab
# press i to enter insert mode
# Edit /dev/backup/databk /backup/data ext4 defaults,usrquota 0 0
# enter Esc and then :wq to save and quit the file

# sudo mount -o remount /backup/data 

Configure the user quotas for the data backup file system

Creates necessary quota files for the file system

# sudo quotacreate -cugm /backup/data

Turn on the quota for the file system
# sudo quotaon -a
# sudo -edquota -u ariley
# edit "/dev/mapper/backup-databk 0 10000 15000 15000 0 500 700"


Start writing to the file system as the ariley user.

  1. Enter sudo chmod 777 /backup/* to give ariley the appropriate permissions.

  2. Enter su - ariley to switch to the ariley user account.

  3. Enter Pa22w0rd when promopted for the password.

  4. Enter dd if=/dev/zero of=/backup/data/myfile bs=1M count=5 to write a 5 MB dummy file named myfile to the data backup directory.


Generate a quota report.

  1. Enter exit to return to your student account.

  2. Enter sudo repquota /backup/data to display the quota results.

  3. Verify that the report indicates how many blocks and inodes ariley is using, as well as the user's hard and soft limits


Exceed the soft limit quota.

  1. Switch back to the ariley account.

  2. Enter dd if=/dev/zero of=/backup/data/myfile2 bs=1M count=7 to exceed the soft limit quota for ariley.

  3. Verify that the results indicate that the user block quota has been exceeded.

  4. The user has reached the soft limit for storage blocks. 

Exceed the hard limit quota.

  1. Enter dd if=/dev/zero of=/backup/data/myfile3 bs=1M count=10 to attempt to exceed the hard quota limit.

  2. Verify that you were unable to write all of the data to the file system because you exceeded the hard limit quota.

  3. Log out as ariley and return to your student01 account.

Comments

Popular posts from this blog

Install Gophish and Start Your Phishing Campaign

Hướng dẫn cách đọc và hiểu thông số firewall - tường lửa