LINUX - MANAGING NETWORK
The OSI Model


- Associating two networks together
- Works at Layer 2 with MAC address


- /etc/hosts
- DNS servers


Configuring the Server's Network Identity
Scenario
You need to ensure the system's hostname and IP address configuration is correct. You also need to be able to configure network settings whether or not a GUI is installed. You will configure the system with both a static IP address and a dynamic IP address.
Objectives
Completing this activity will help you to use content examples from the following syllabus objectives:
1.3 Given a scenario, configure and verify network connection parameters
2.7 Explain the use and operation of Linux devices
Set the server's hostname
Log in as student01 with Pa22w0rd as the password.
In a terminal window, enter hostname to view the system's current hostname.
Enter nmcli general hostname to use a different command to view the system's current hostname.
Enter sudo hostnamectl set-hostname server01 to configure a new hostname.
Enter sudo systemctl restart systemd-hostnamed to restart the service, making the change persistent.
Recall that you will almost always have to restart services for changes to be implemented.
Verify that your system's hostname has changed.
Verify the current IP address configuration of the server
Enter man ifconfig and note the man page entry that indicates the tool is deprecated (retired).
Press q to quit.
Type ip (don't press Enter), add a space, then press Tab twice to see a list of available subcommands.
Be sure to include a space before pressing Tab twice. This tip takes advantage of tab completion. It displays the subcommands associated with the ip command.
Enter ip addr to display information about available network interfaces.
On CentOS 7, the main Ethernet device you should use will usually be named in the format enp#s#. For the following steps, make sure you're using the NIC identified with this name, and not the loopback adapter or a wireless LAN adapter.
You may enter the device ID below:
Enter ip addr show ens32 to display the information for a specific NIC.
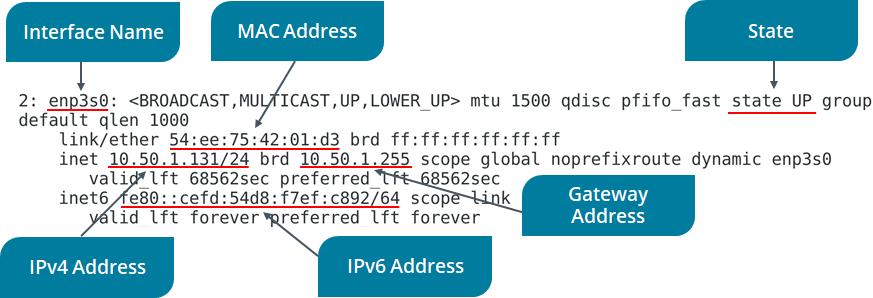
Use the NIC device ID from the output of the previous step. For example, the device ID value might be enp0s3
One of the first steps in networking troubleshooting is to verify the current IP address configuration. Therefore, the ip command will be essential to your network troubleshooting process.
Display network information by using nmcli
Enter nmcli general status to view the current network connectivity status according to NetworkManager.
Enter nmcli connection show to see the name, UUID, type, and device ID for each NIC.

Enter nmcli con down ens32 to stop the NIC, making it inactive.
Enter nmcli device status to view the current status.
Enter nmcli con up ens32 to re-enable the NIC, making it active.
Enter nmcli device status to view the current status.

Configure the system with a static IP address using nmcli
Enter ip addr show ens32 to view the current IP address.
Enter nmcli con edit ens32 to edit the NIC's configuration.
Enter set ipv4.addresses 10.50.1.101/24 to set the static IP address at the nmcli prompt.
It is possible your lab environment will have slightly different IP addressing information.
Press Enter to set ipv4.method to manual
Enter save at the nmcli prompt.
Enter quit at the nmcli prompt.
Enter nmcli con down ens32
Enter nmcli con up ens32 to reset the device.
Enter ip addr show ens32 to confirm the static IP address is configured.


Configure the system as a DHCP client
Enter nmtui at the prompt to open a new interface.
Use the Tab key and the Arrow keys to navigate text-based user interfaces. Use the Spacebar to check/uncheck settings. Use the Enter key to accept a configuration.
Make sure Edit a connection is highlighted, and then press Enter.
With your device ID ens32 highlighted from the Ethernet menu, press the Right Arrow key once then the Down Arrow key to highlight < Edit…> and then press Enter.
Notice the static IP address, as configured in the previous task.
Press the Tab key three times to move to the IPv4 CONFIGURATION line.
That line currently displays <Manual>
Press Enter and select Automatic from the menu.
Press the Tab key multiple times until you reach the bottom of the interface and < OK > is highlighted.
Press Enter to save your changes to the network configuration.
Use the Tab key to highlight < Back > and then press Enter.
In the NetworkManager TUI interface, use the Down Arrow key to highlight Quit and then press Enter.
Enter ip addr show ens32 and notice that the old statically assigned IP address is still in place. This is because you need to restart the network service for changes to take effect.
Enter sudo systemctl restart network
Enter ip addr show ens32 and notice a new IP address is configured, leased from a DHCP server.

Using the GUI, reconfigure the NIC to use a static IP address
From the desktop menu, select Applications→System Tools→Settings.
In the Settings menu, select Network.
Notice the NIC is displayed as Connected and On.
Select the Configuration gear button.
The NIC details may still show the static IP address.
Select the Apply button in the upper-right corner of the interface.
Select the slider to turn the NIC Off, then turn it back On.
Select the Configuration gear button again and note the leased IP address.
Select the IPv4 tab.
Observe that the Automatic (DHCP) button is selected, as configured in the previous nmtui task.
Select the Manual radio button, and then fill in the Address, Netmask, and Gateway fields:
- IP address: 10.50.1.101
- Subnet mask: 255.255.255.0 or /24
- Gateway: 10.50.1.1
Your lab environment may have different IP addressing information.
In the DNS field, enter 8.8.8.8
This is one of Google's DNS servers.
Select Apply.
Select the slider to turn the NIC Off, then turn it back On.
Close the Settings window.
Test the network configuration by opening Applications→Favorites→Firefox Web Browser and browsing to the https://www.comptia.org website.
When you're done, close the browser.
Verifying Network Configurations
Scenario
Now that you've configured a NIC, you need to verify that those configurations are active and accurate. So, you'll use ethtool and the device's configuration file to confirm the networking details.
Objectives
Completing this activity will help you to use content examples from the following syllabus objectives:
1.3 Given a scenario, configure and verify network connection parameters
2.7 Explain the use and operation of Linux devices
Gather information with ethtool
If necessary, enter ip a to recall your Ethernet device ID.
Enter ethtool ens32
Verify that you can see information about the NIC's capabilities and configurations.
You should be able to see the NIC's maximum bandwidth speed, its duplex capabilities, its supported link modes, and more.

View network configuration files
Enter ls /etc/sysconfig/network-scripts to display the contents.
Verify that there is a ifcfg-ens32 file.
Enter cat /etc/sysconfig/network-scripts/ifcfg-ens32 to view the contents.
Verify that you can see device information as well as IP addressing information for this NIC.

Configuring a DNS Client
Scenario
In addition to setting up machine-friendly IP addressing, you also need to account for the fact that humans aren't good at remembering long strings of numbers. So, you'll configure name resolution to relate a hostname with an IP address so that users can easily refer to a specific computer on the network.
Objectives
Completing this activity will help you to use content examples from the following syllabus objectives:
1.3 Given a scenario, configure and verify network connection parameters
2.7 Explain the use and operation of Linux devices
Review the IP address and hostname identities of your system
Enter hostname to view the system's user-friendly name.
Enter ip addr show ens32 to view the system's IP address.
Humans don't tend to be good at remembering long strings of numbers. Name resolution is used to relate the hostname and the IP address values displayed above.
If the leased IP address is still visible, use nmcli con down ens32 and then nmcli con up ens32 to reset the interface.
Try connecting to the second server by name and by IP address
Enter ping server02 and verify that it fails.
Enter ping 10.50.1.102 and verify that it succeeds.
Press Ctrl+C to interrupt the process.
One effective way of testing name resolution is to ping a destination host by name. If that fails, then ping the same host by IP address. If that succeeds, then you know that you have a good network connection to the destination, but that name resolution is failing.
Configure the server name for your second server
Select CentOS 7 (2nd) to access your second virtual machine.
Log in as student02 with Pa22w0rd as the password.
In a terminal window, enter sudo hostnamectl set-hostname server02 to configure a new hostname.
Enter sudo systemctl restart systemd-hostnamed to restart the service, making the change persistent.
Verify that your second system's hostname has changed by using the hostname command.
Configure name resolution for your system
Select CentOS 7 to return to server01. If necessary, use Pa22w0rd to sign back in.
Enter cat /etc/resolv.conf to display the DNS server(s) the system is configured to query.
Note the spelling of the file name: resolv.conf
Enter cat /etc/hosts to display the static text file that can be used for name resolution.
Using sudo, open the text editor of your choice to add your second server's hostname and IP address information into the /etc/hosts file in the format: 10.50.1.102 server02
Save and close the file.
Ping your second server's hostname and IP address again and verify that, this time, both succeed.
Ensure name resolution for Internet identities is functioning correctly
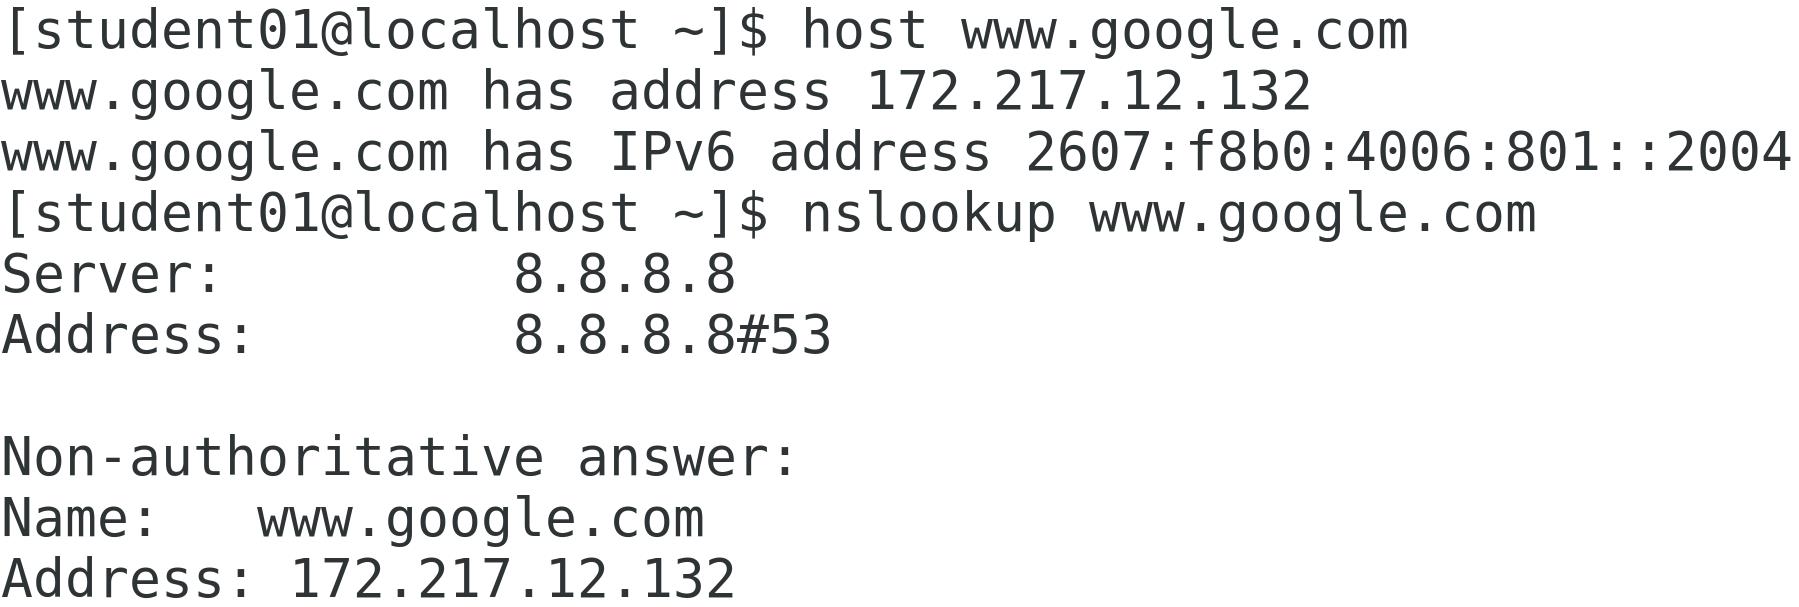
Enter host www.google.com
Enter nslookup www.google.com
Verify that you receive IP addressing results for google.com with each command.

Configuring Virtualization
Scenario
One of the developers at Develetech has asked for your help. She needs Linux test environments to test that her application functions as designed. She'd like to manage the environments herself and be able to revert back to their original configuration for each test. You will install a KVM virtualization solution for her.
Objectives
Completing this activity will help you to use content examples from the following syllabus objectives:
- 1.5 Compare and contrast cloud and virtualization concepts and technologies
What are some of the potential benefits of virtualization? Click here for answer.
Install the KVM virtualization software
Enter cat /proc/cpuinfo | grep vmx and then enter cat /proc/cpuinfo | grep svm to check the processor. If either term is found, the processor should support hardware-assisted virtualization.
Carefully enter the following command on one line. Check your syntax before you hit Enter:
sudo yum -y install qemu-kvm qemu-img virt-manager libvirt libvirt-python libvirt-client virt-install virt-viewer bridge-utils librbd1 librbd1-devel libsolv
This installs KVM and dependent software.
Wait for KVM to finish installing.

Start the KVM service
Enter sudo systemctl start libvirtd to start the service.
The name of the KVM service is libvirtd
Enter sudo systemctl enable libvirtd to make the service persist.
Enter lsmod | grep kvm and verify that the KVM kernel module is loaded.

Configuring Virtualization
Scenario
One of the developers at Develetech has asked for your help. She needs Linux test environments to test that her application functions as designed. She'd like to manage the environments herself and be able to revert back to their original configuration for each test. You will install a KVM virtualization solution for her.
Objectives
Completing this activity will help you to use content examples from the following syllabus objectives:
- 1.5 Compare and contrast cloud and virtualization concepts and technologies
What are some of the potential benefits of virtualization? Click here for answer.
Install the KVM virtualization software
Enter cat /proc/cpuinfo | grep vmx and then enter cat /proc/cpuinfo | grep svm to check the processor. If either term is found, the processor should support hardware-assisted virtualization.
Carefully enter the following command on one line. Check your syntax before you hit Enter:
sudo yum -y install qemu-kvm qemu-img virt-manager libvirt libvirt-python libvirt-client virt-install virt-viewer bridge-utils librbd1 librbd1-devel libsolv
This installs KVM and dependent software.
Wait for KVM to finish installing.
Start the KVM service
Enter sudo systemctl start libvirtd to start the service.
The name of the KVM service is libvirtd
Enter sudo systemctl enable libvirtd to make the service persist.
Enter lsmod | grep kvm and verify that the KVM kernel module is loaded.
Create a VM at the CLI
Carefully enter the following command on one line. Check your syntax before you hit Enter:
sudo virt-install --name=devtech-install --vcpus=1 --memory=2048 --cdrom=/opt/linuxplus/managing_networking/CentOS-7-x86_64-DVD-1810.iso --disk size=12 --os-variant=rhel7
This defines the hardware specifications of the virtual machine to create. The VM will use one virtual CPU, have access to 2 GB of RAM, use the provided system image to boot from, and have access to a 12 GB storage drive.
Close the devtech-install(1) - VirtViewer window that pops up and select OK when prompted.
Enter sudo virsh save devtech-install saved-vm to stop the VM and save its state for later.
Import a VM image using the GUI Virtual Machine Manager
From the desktop menu, select Applications→System Tools→Virtual Machine Manager.
Enter the root password to continue.
In the Virtual Machine Manager, select File→New Virtual Machine.
In the New VM wizard, for the first step, select Import existing disk image, then select Forward.
For the second step, select Browse and then select Browse Local.
From the navigation menu, select + Other Locations.
Select Computer.
Navigate to /opt/linuxplus/managing_networking and open ubuntu-vm.qcow2.
Select Forward.
For the third step, change the Memory (RAM) to 2048 and ensure CPUs is set at 1.
Select Forward.
For the fourth step, name the VM ubuntu-vm and select Finish.
Get acquainted with Ubuntu, a different distribution of Linux
Verify that a virtual machine window named ubuntu-vm on QEMU/KVM automatically pops up.
Wait for the authentication screen (it may take 1-2 minutes).
Log in to the Ubuntu virtual machine using student as the account and Pa22w0rd as the password.
Verify that you successfully signed in to the Ubuntu desktop.
If you receive an error that there is no space left on the device, reboot CentOS and try again.
From the bottom-left corner, select the Show Applications button
 . You might need to scroll the VM window down to locate this button.
If at any time you're prompted by the Software Updater dialog box, select Remind Me Later.
Select the Settings icon.
In the Settings window, from the navigation menu, select Network.
Select the configuration gear icon for the Wired connection to view the Ubuntu VM's networking information.
Select Cancel to close the Wired window, then close the Settings window.
From the Show Applications menu, select the Utilities icon.
Select the Logs icon.
Observe the log files that are displayed (it may take 1-2 minutes), then close the Logs window when you're done.
From the dock on the left side of the desktop, select the Ubuntu Software icon.
At the top of the window, select the Installed tab.
Scroll down and verify that Vim is installed, then close the window when you're done.
Shut down the virtual machine
Close the virtual machine window.
Right-click the ubuntu-vm VM and select Shut Down→Shut Down.
You may need to issue the shut down command twice.
Wait for the VM's state to change to Shutoff.
Close Virtual Machine Manager.
View network services that are currently listening on the hosts in your network.
Enter ip addr to verify the system has a correct IP address configuration.
When troubleshooting, an IP address that begins with 169.254 indicates the client could not lease an IP address from a DHCP server. The 169.254.0.0 IP address range is known as the Automatic Private IP Address (APIPA) range.
Enter ss -l | less to see what TCP ports your system is currently listening on, then press q to return to the prompt.
Enter nc localhost 21
You should receive a "Connection refused" error, indicating that your system is not listening on port 21 (FTP).
Enter nc server02 22 to verify that the second lab VM is listening on port 22 (SSH).
Press Ctrl+C to disconnect.
You can use a tool like nc to identify network services that aren't listening on the local or remote host.
Test public name resolution
Enter host www.comptia.org at the command prompt.
Verify that you resolved the public CompTIA hostname to a specific IP address.
You can use a name resolution tool like host to ensure that you can establish a connection to hosts using human-friendly hostnames.

Capture network traffic
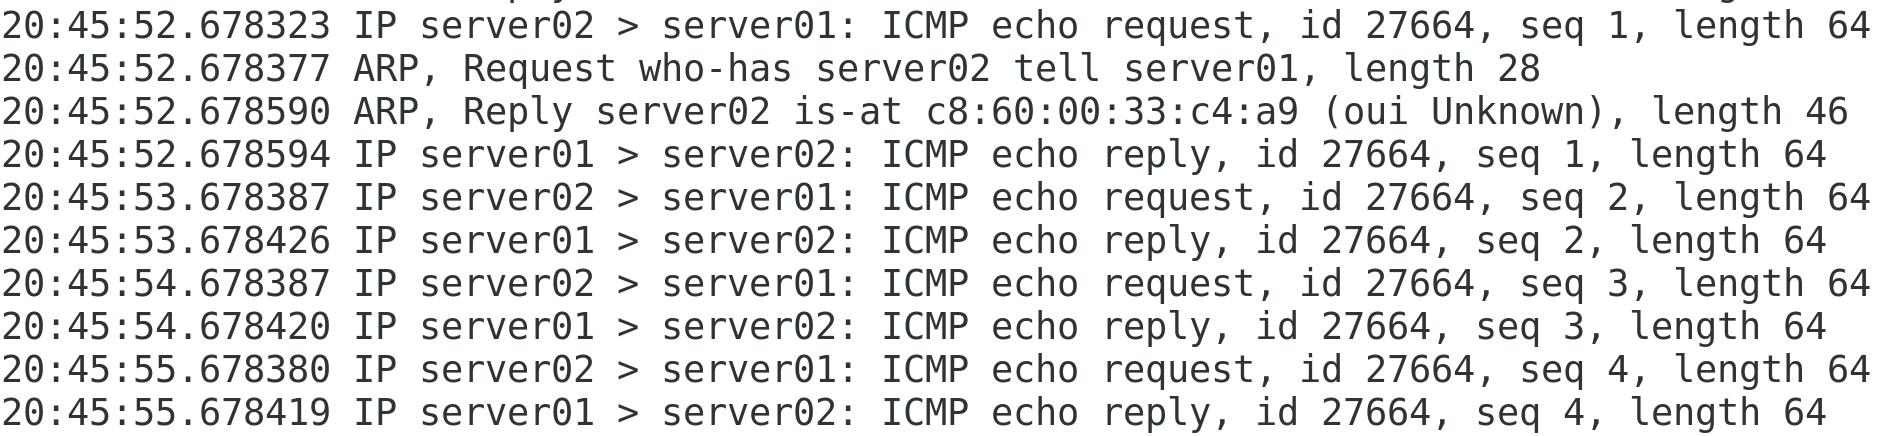
Enter sudo tcpdump -i ens32 where device ID is your Ethernet device name.
Verify that the tcpdump tool is listening on the device.
Right-click the desktop and select Open Terminal to open another terminal.
In this new terminal, enter ping server02 -c 4
In the other terminal window, verify that tcpdump captured the ICMP echo traffic.
You can use a network capture tool like tcpdump to learn more about the traffic that is transmitted and received over your network.
Close the terminal window running the tcpdump capture.


Comments
Post a Comment